7 Steps to Start a High Ticket Dropshipping Business (2025)
Are you considering starting a high-ticket dropshipping business in 2025? I tried starting one not too long ago, and it was exciting and a bit overwhelming all at once. So, how do you start a high ticket dropshipping business the right way?
To start a high ticket dropshipping business, you need to select a product, do some basic market research, create your website, contact dropship suppliers, optimize your site for conversions, set up ads to get traffic to your site, and finally automate and outsource and build a team to grow your business.
In this article, I will share the 7-step plan I followed to build my high-ticket dropshipping business, plus give a few tips and share the actual store I built.
If you would like a complete course on how to do what I did to start my high ticket dropshipping business, check out this course I used to help me get started.
How to Start a High Ticket Dropshipping Business – A 7-Step Plan With Example
A high ticket dropshipping business sells higher-priced products to upper-income families ranging from $200 to $2000. These products typically make higher commissions per sale without selling thousands or even hundreds of products.
For example, would you instead sell a $10 product that makes you $3 per sale, or would you rather sell a $1000 product that earns you $300 per sale? The answer is obvious here.
So, what is the process for starting your high ticket dropshipping business? Keep reading.
Step 1: Niche Selection
The first step to starting your high ticket dropshipping business is to select your niche or, more importantly, the product you want to sell. The product you sell is the niche of your dropshipping business.
You don’t want to start a store that sells everything. You want to start a store that sells a specific product. This will help differentiate you from other online stores out there.
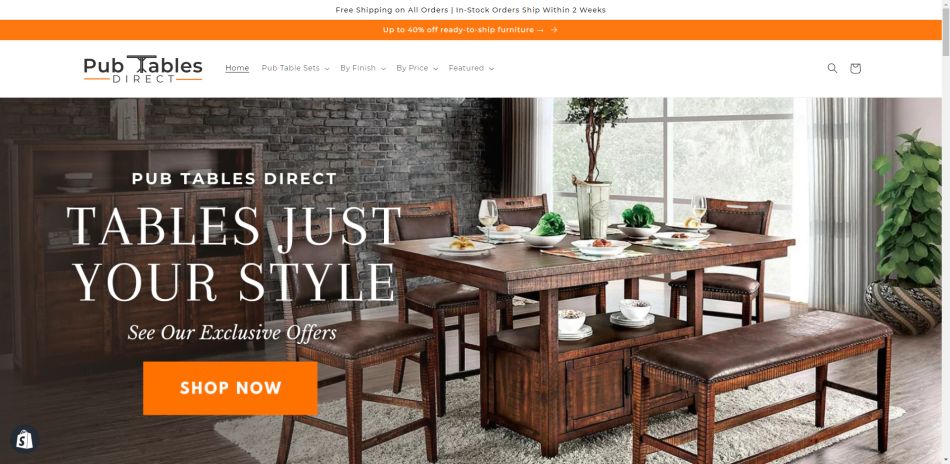
For example, the niche I chose was pub tables. The average product price is around $614, which is between $200 and $2000.
You also want to stay away from complicated products, such as electronics. For example, if you sell GPS such as Garmin, you’ll likely get many customer service calls on how to use the product.
You also want to avoid products with high return rates, such as clothing or shoes. The last thing you want to do is spend countless hours shipping things back to suppliers.
You also want to avoid brand-loyal products. Becoming a supplier of these types of products can be nearly impossible. For example, Apple makes a great phone, but unless you’re Verizon, AT&T, or Walmart, you won’t become a supplier with them.
Finally, you want to pick a product with a target audience in the upper-income class. This group tends to spend a lot and doesn’t return products much.
You’ll want to stay away from the wealthy class. These people tend to spend a lot but can be picky about what they buy.
Also, want to stay away from low-income buyers. These buyers tend to be picky about price and base most of their decisions around it.
Step 1 Task
- Write out a list of 25 to 50 products that fit the price range between $200 to $2000.
- Don’t add products that are complicated or that have high return rates.
- Don’t pick a product that has a big brand associated with it.
Step 2: Market Research
Now that you have a list of potential products you could sell in your store, you need to narrow this list down and eliminate the ones that don’t fit the criteria I’m about to cover. From there, we’ll choose your product niche.
In this step, you’ll want to dive deeper into the products you’re considering. Of all the steps, this may be the most important.
If you pick the wrong product, you could spend countless hours building a website, setting up ads, and contacting suppliers, all to find out your store was doomed from the beginning.
Here is a list of criteria your product needs to meet to be considered.
- The product price is between $200 to $2000.
- Product demand should be over 10,000 searches a month.
- The product should pass the evergreen test.
- The product should pass the brand loyalty test.
- The product should pass the demographic test.
- The product should be dropship-friendly.
Let’s go through these points, and I’ll show you how to do this research.
You’ll want to set up a Google Doc or Excel Spreadsheet to track all of this information. If a product does not meet any of the qualifications, mark it off the list and stop researching it.
Product Price
First, you must determine the average product price to ensure it fits between the $200 to $2000 price point.
You won’t earn much profit if it is any lower than this. If it is any higher than this, people will likely need to go through multiple steps and see the product before they buy it.
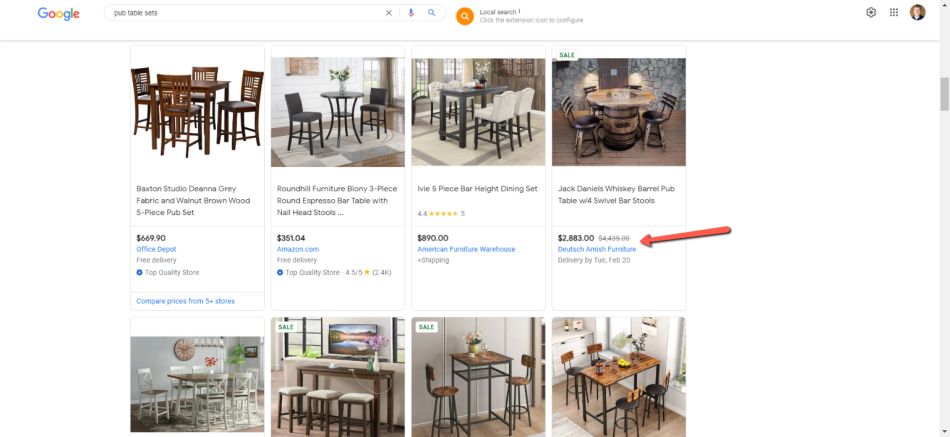
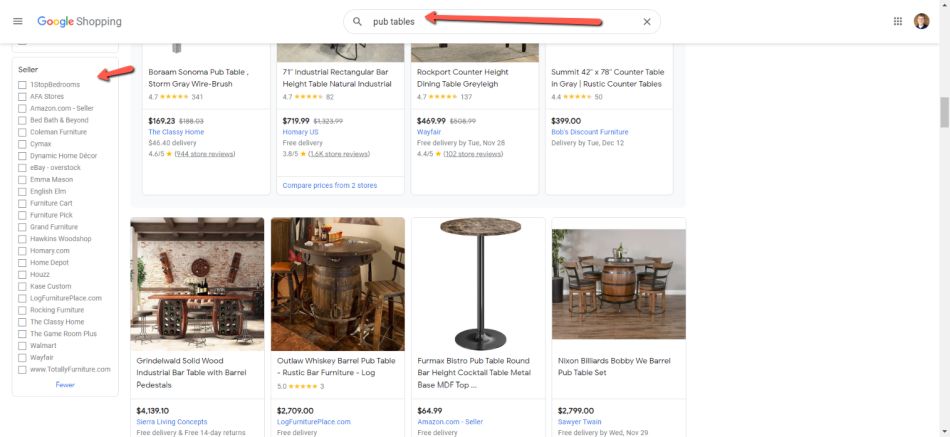
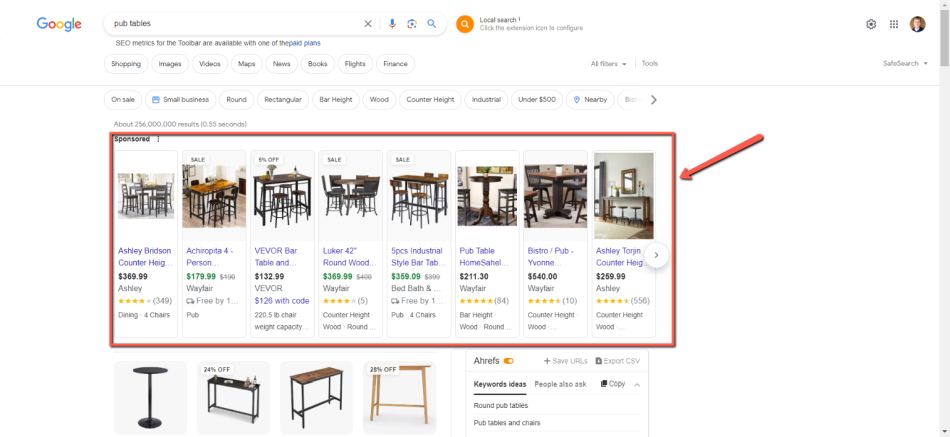
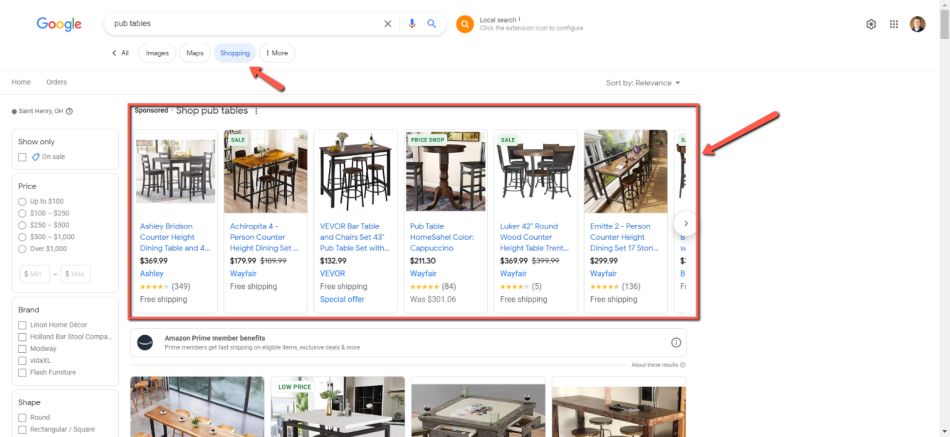
So, how do you determine the average price of a product? Start by going to Google Shopping and typing in the type of product you want to sell. In my case, I chose “pub table sets.”
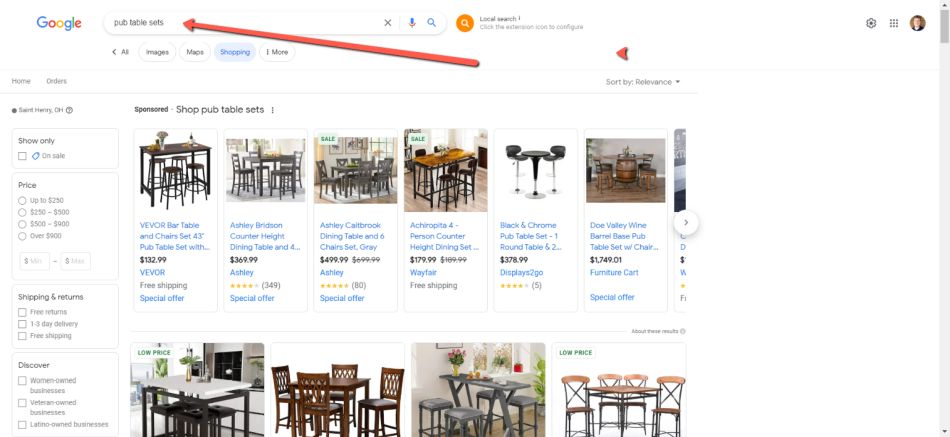
From here, set up a Google doc and write down the price of each product. Don’t include sponsored products on the page, just those in the organic search listings.
From there, select and average all the prices, which will tell you the average product value. Below is the research I did for my product.
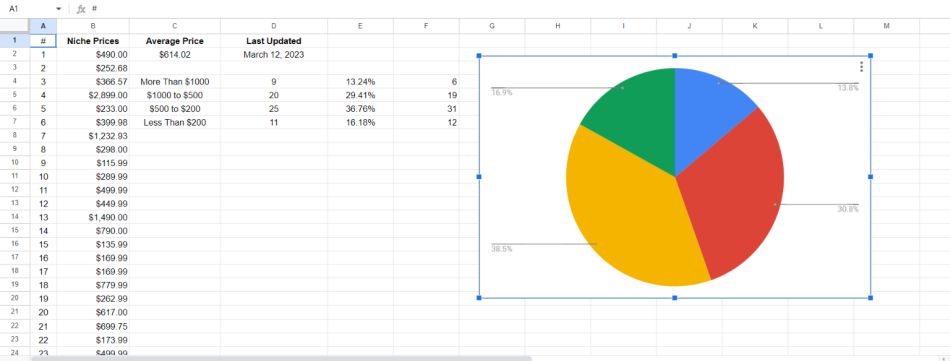
As you can see, the average price of my product is $614 and fits the $200 to $2000 price range.
Product Demand
Next, you’ll want to look at product demand. This is an estimate of how much traffic is searching for this product. Overall, you’ll want at least 10,000 monthly searches for this product.
To do this, pull up this tool from Wordsteam. This free keyword tool will help you determine the amount of product demand.
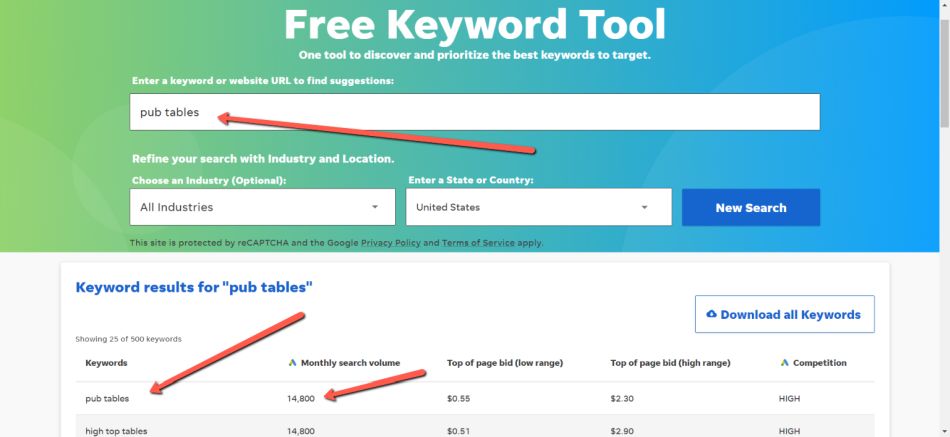
As you can see, I typed in my keyword pub tables and got 14,800 searches a month, which means it passes the 10,000 monthly visitor threshold.
Evergreen Test
Next, we need to do an evergreen test to ensure the product is bought all year. The last thing you want to do is be in a niche that is only sold a few months out of the year.
For example, a niche that would not be evergreen would be skiing. Since the ski season only lasts 2 to 3 months a year, this would be a bad niche to pick.
To determine if your niche is evergreen, go to Google Trends and type in your product. So, let’s type in my product pub tables and see what we get.
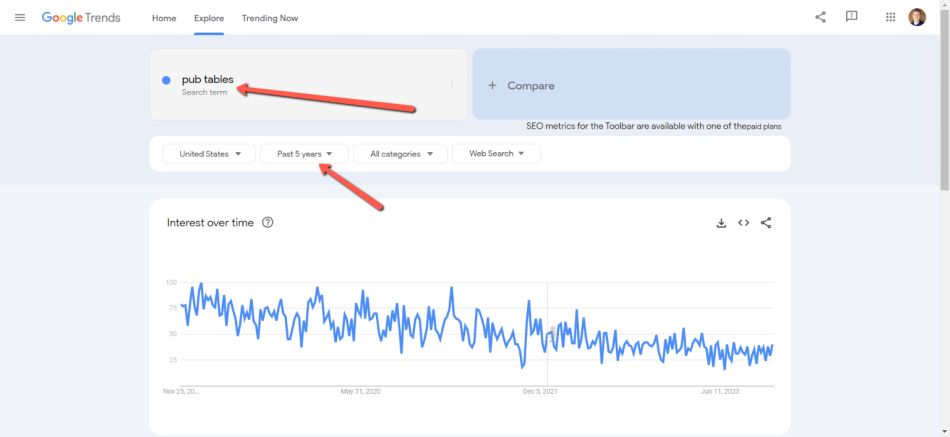
To do this, set the time to the Past 5 Years. This will give you the best view of the data. In my case, pub tables are evergreen and consistent.
Here’s what a bad niche might look like.
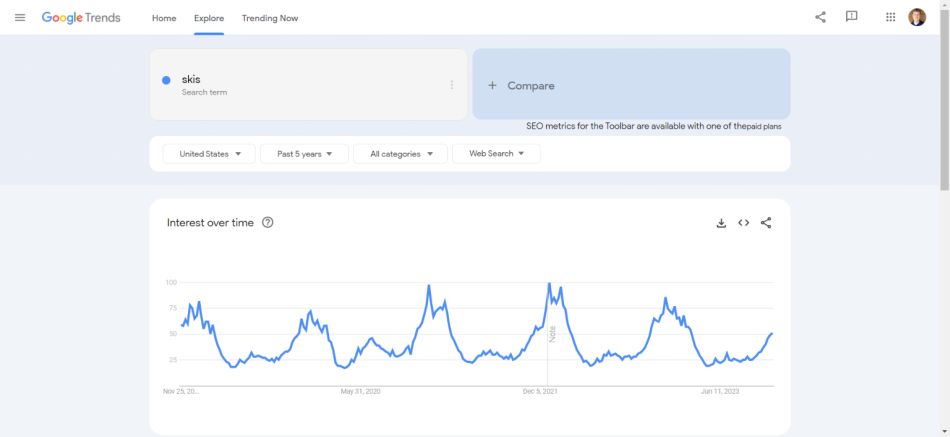
When I typed in skis, it was obvious that traffic picked up at certain times of the year and dropped off shortly after that.
Brand Loyalty Test
Next, we need to see if your product has any brand loyalty. To be clear, you do not want brand loyalty in your niche.
For example, if I tell you that I want to get a new cell phone, what brand comes to mind? Apple, and Samsung. What brand comes to mind if I want a new pub table? Nothing.
A simple way to tell if a product has brand loyalty is whether or not you can name any brand in that niche. If you can’t, it does not have brand loyalty.
This is what you want when you’re picking your product. You’ll want to avoid this product if you know of a dominant brand in your niche.
Demographic Test
In this test, we need to see if your product fits the demographics of the upper middle-income class. As I mentioned, this group loves to spend money, and price point isn’t always a big concern.
To do this, return to Google Shopping, look at your product again, and look through the results. Below is one of the highest-priced products on the list that costs $2883.
Even though this product is outside of my price range, it still works, and overall, most of the products fit inside of this range, which tells me that upper-income families will buy this product.
Now, let’s look at a product that would not fit this.
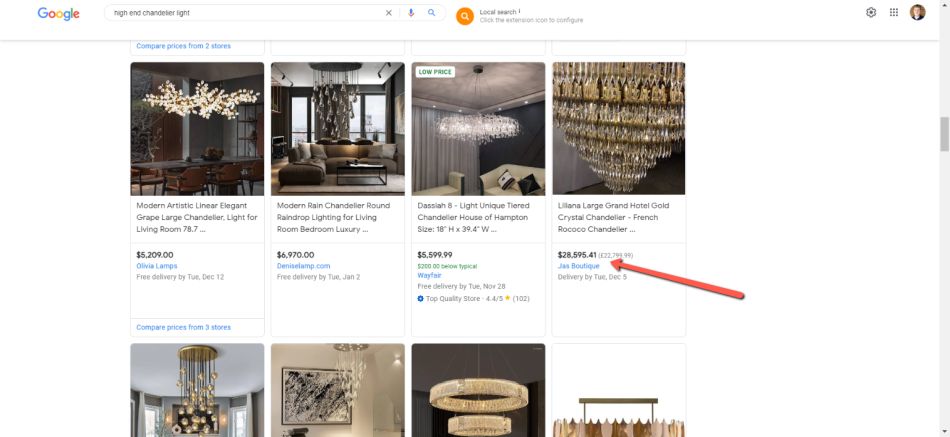
As you can see, this chandelier is $ 28,595 and goes way outside our product demographic. If any products are in this price range, you’ll want to avoid this niche.
If you find just a few products in this range, you’ll want to avoid selling those products in your store since you’ll attract the wrong demographic.
Dropship Friendly Test
The final test you must do is to ensure your product is dropship-friendly. If your product is not dropship-friendly, you’ll have trouble getting suppliers.
To this, you’ll want to make sure your competitors do not have three things.
- A physical store.
- A warehouse location.
- A showroom.
You want to find competitors that don’t have a physical location. Stores without physical locations mean they are dropshipping products in that niche.
You’ll need to search a few of your competitors to do this. Start by searching on Google Shopping for your product.
One of the first stores I found was this one, and I immediately saw a problem with it.
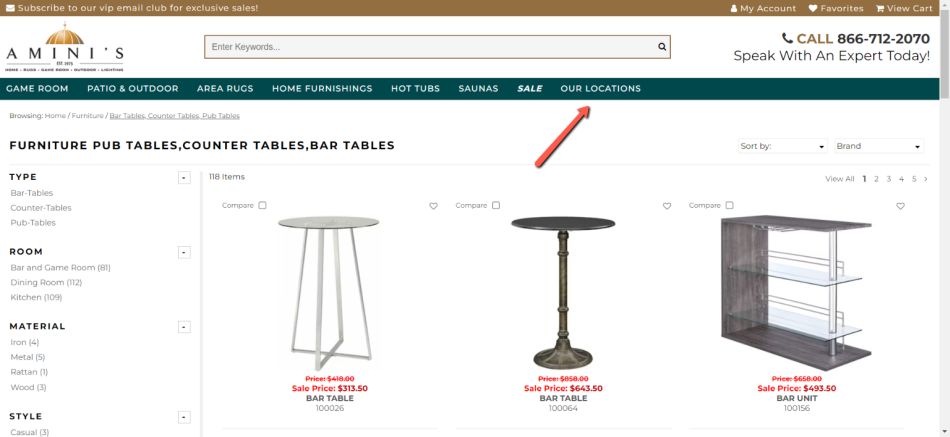
The problem with this store is that it has physical locations. However, this won’t always be easy to spot. You’ll likely have to play detective and look at their contact page, about page, shipping page, to see if they mention anything about a store, warehouse, or showroom.
You want to find competitors that do not have a showroom, store, or warehouse. This means they are a dropshipping business.
Now, let’s look at an example of a store that does only drop shipping.
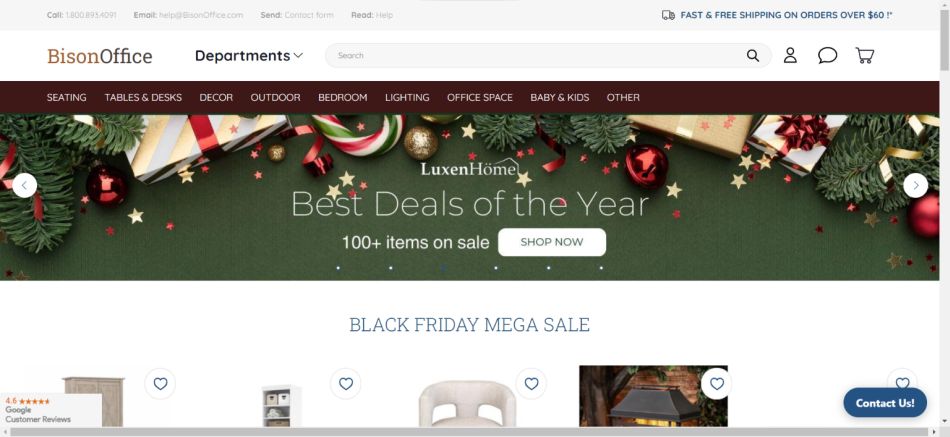
If you look through this entire site, you’ll see they don’t have any physical location. You’ll want to find several sites like this. In the pub tables niche, I found around 22 dropshipping stores altogether.
Step 2 Task
- Go through the abovementioned tests and cross off all products that do not meet the requirements.
- Set up a spreadsheet on Google Docs or Excel to help you track all of your information.
- With the remaining niches left on the sheet that passes all of the tests, choose the best one.
If you have multiple niches that pass the test I like to choose the one with the highest price point. This will drive higher profits per sale without having to make a lot of sales per month.
Step 3: Create Your Website
You should have picked your product based on your research in step 2. Now it’s time to create your website for your high ticket dropshipping business.
Now, you might be wondering why I should create a website, I haven’t even contacted product suppliers. Before you can contact suppliers, you need to have a website where you can show suppliers what you do.
Before you can contact suppliers, you need to have a website you can show them. Otherwise, they will not approve you.
You might be wondering how I can set up a website if I have no products to list on my site. Now, you need to search the internet and find ten images of products you can put on your site.
Suppliers want to know that you have a quality website to list their products on. They will likely not accept you if you don’t have a website.
So, how do you set up your website? Shopify is the best way to set up your high ticket dropshipping business, manage your products, and make the most sales.
Not sure how much it will cost you to start a dropshipping business? Here are 11 dropshipping costs that you will have in your business.
When designing and creating your store, I could write a 10,000-word article here, so I included a video of the store I created. This will help you get an idea of what you should create.
I did not design this store myself because I’m not good at it, but as a member of Dropship Lifestyle, I paid them to do this for me. You can learn more about that here.
To start, sign up for Shopify. A lot of times, you can get a 14-day free trial offer.
If you sign up as a member of Dropship Lifestyle they have an entire section on how to set up your Shopify store. On top of that as a member, you can also have design your store for you for an extra fee.
If you plan to do all of this yourself, here is a list of things you need to have on your website before you can move on to contacting suppliers.
- Website logo
- A Well Designed Store
- A collection of at least ten products
- An About Page – Talks about your store
- A Contact Page
- A Privacy Policy
- A Shipping Policy
- A Return Policy
Creating a site like this can be a lot of work, especially if you don’t know what you’re doing. This is why I recommend spending the extra money on getting a pro to do this for you.
They will make your store look great, and most of all, it will go a long way to get suppliers to work with you when they see an excellent, clean website.
Step 3 Task
- Sign up with Shopify and create your website, including all the items from the list above.
- If you don’t want to do this, hire someone to design it.
Step 4: Contact Drop Ship Suppliers
Now that you have your website built, it’s time to start contacting suppliers so you can add products to your store.
If you’re like me, you might be a little nervous about contacting suppliers for the first time, but let me tell you, as someone who has done this before, it’s not as bad as you think it might be.
However, before contacting suppliers, you need to do a few things suppliers will be looking for before they accept you.
- Phone Number. You will need a phone number for your business. A 1-800 number is the best option, but it cost money. If you’re like me and want to keep things cheap, you can get a Google Phone number for free. If you want an 800 number, check out Grasshopper.
- Business Address. Next, you need a business address. The last thing you want to do is put your home address on your store. Instead, get a business address by visiting the UPS Store in your local area. Do not get a PO Box; suppliers do not like this.
- Set Up an LLC. An LLC is a Limited Liability Company that protects you from your business. If someone sued your store, they could only get the assets of the business. Without it, they could take your house, money, and more. To sign up for an LLC, check out LegalZoom.
- Sales Tax Certificate. All suppliers will require you to have a sales tax certificate and will ask for this number when signing up with them. This certificate allows you to collect sales tax on behalf of your state. To get this, go to your local county auditor’s office.
- Set Up Google Workspace. Next, you’ll want to set up a Google Workspace account. This will give you access to all the tools to run your business. Most importantly, it will allow you to set up a unique email address for your business—for example, [email protected].
Next, you must assemble a list of suppliers you can contact. These companies should accept eCommerce-only stores. So, how do you do this?
First, go to Google Shopping and type in the product you plan to sell. Then, look at the list of suppliers on the side.
Next, you’ll want to research these sellers and ensure they do not have a physical location, showroom, warehouse, or store.
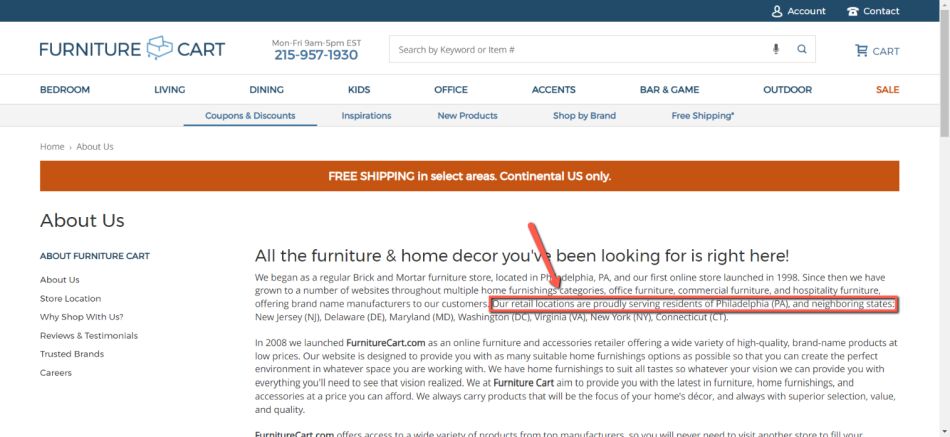
So, let’s look at a seller example. I picked Furniture Cart as my first pick. This store looks like it is e-commerce only, which it might have been originally, but when I searched the About page, it said this.
They have retail locations. If you see this, take them off of your list. You want sellers who only sell online.
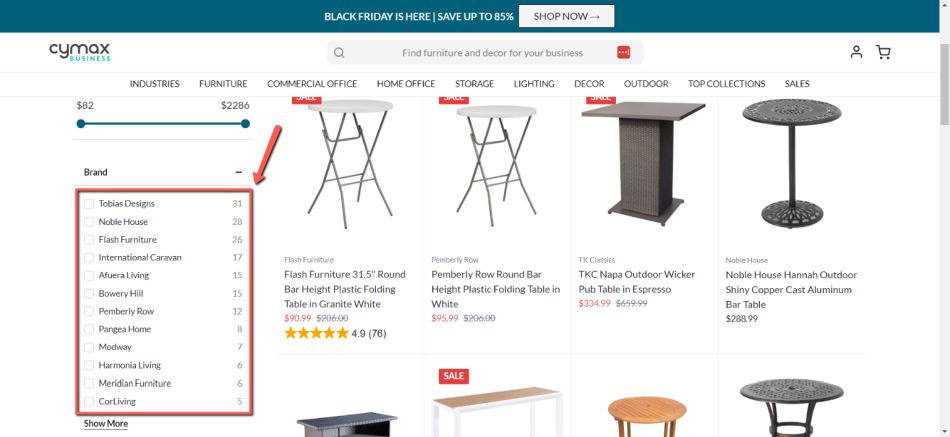
Now, let’s look at a seller site that is e-commerce only. This site is called Cymax. After looking at this, I found their company address.

One clue they don’t have a retail store is that they have a suite number in the address. To be sure, I looked the address up on Google Maps, and I got this.
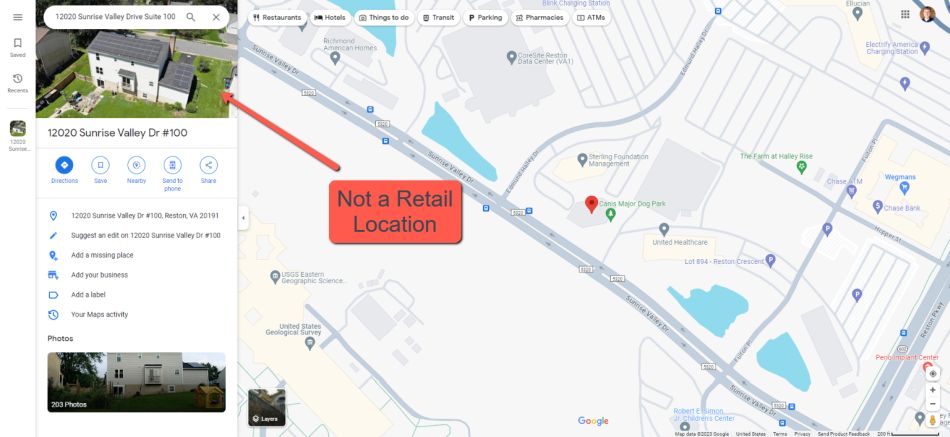
As you can see, this is not a retail location, so it would be considered an e-commerce-only store.
Once you find an e-commerce-only site, you will look at all the suppliers they have listed on their site. The suppliers listed on this site are suppliers that work with e-commerce sites.
Write all of these suppliers in your spreadsheet. Look up their phone number, email contact address, or contact page. If you can’t find any info, leave it blank.
If you can’t find a company’s contact info do a search on Google for the company address or phone number.
Once you have these things in place, you can start contacting suppliers, but what do you say to them?
I used a simple script to talk to suppliers and get them to sign up.
When you call suppliers, DO NOT tell them you’re a drop shipper. Suppliers don’t like this term. Tell them you run an eCommerce site if they ask what you do.
When you call the company, you will first reach the receptionist, who will direct you to the person you need to talk to. At this point, I ask them:
“My name is [Name] with [Company Name]. Who can I talk to about setting up a new distributor account?
From here, you can get directed a few ways:
- They may not be taking on new companies and decline you.
- Direct you to the next person to talk to.
- Tell you where to complete the new account application.
If you are directed to the account manager, then say this:
“Hi, my name is [Name], and I’m with [Company Name]. We’re launching our new store [yourwebsitename.com] in the next few weeks, and we came across your company and feel your products would make a great fit for our store. We want to open a new account.”
At this point, they will either say Yes or No. If they say yes and direct you toward an application, fill it out immediately and return it. This will ensure you the best chance of being accepted.
If the script isn’t written how you would say it, rewrite it to fit your ton and personality,
One final thing you need to know about suppliers is that not all suppliers are identical. Some are going to be great suppliers, while others are going to be terrible. So here are a few things to avoid when you call these suppliers.
- Avoid suppliers to charge you to sell their products. You should never have to pay.
- The best suppliers will enforce MAP (Minimum Advertising Price) policies. This means there is a limit on how low you can set your price for the products you sell.
- Avoid companies that don’t have good customer service or fulfillment of orders.
Step 4 Task
- Set up your phone number, business address, LLC, and sales tax certificate.
- Create a list of 25 to 30 suppliers to contact. Add their names to the spreadsheet you have created.
- Contact suppliers. You want at least 2 to 5 suppliers to sign up with you before you launch.
Step 5: Optimize Your Site
Now that you have suppliers, you’re almost ready to launch your site, but there are a few things you need to do to improve your site conversion. Without this, you’ll likely not get as many sales.
Here are several tips to help you optimize your high ticket dropshipping business.
1. Create Expiring Coupon Codes
If you want people to buy your products, you’ll need to give them some deals to push them over the edge and commit to buying from you. The best way to do that is to create an expiring coupon code.
With an expiring coupon, you can put a coupon in effect for a specific amount of time. This will give your customers a small deal and you the sale. This one tip will increase sales by 10 to 20%.
2. Shipping and Return Policy
Next, you need to have a shipping and return policy that explains how it works when people buy something from you. People want to know how they will get what they want and what they can do if they want to return it.
First off, need to explain what will happen when people buy. Be clear here. For example, they will receive an initial email about the sale they just made, an email when the product ships, and an email when it is delivered.
The policy should also cover the return policy, how long they must return it to receive a refund, and how the money will be returned.
The return policy depends on the supplier. If most of the suppliers on your website offer a 30-day return policy, list it on all of your product pages if certain suppliers list that on those specific supplier pages.
3. Get Product Review – Judge.me Shopify App
Product reviews are also critical when it comes to your store. This does a couple of things for your site.
- First, it proves that people are buying stuff from your store and that you are legit.
- Second, it shows that you have quality products when you have good ratings.
When you’re first starting out, you won’t have any reviews. A good way to add these is by asking your suppliers if they have any product reviews that you can add to your site.
You will also want to add a Shopify app called Judge.me. This app will help you collect reviews by emailing your customers after they buy your products and asking them to leave a review.
4. Setup Social Media Pages
Next, you’ll want to set up some basic social media pages for your site. Here are just a few to consider setting up.
- Facebook. It’s a great place to share new coupons and discounts.
- YouTube. This is also a great place to create videos about products and share more about you and your company.
- Instagram. It is a great place to share product images and pictures of your products that your customers send you.
- Twitter. It is a great place to share discounts and product images, using hashtags and groups to get found.
- Pinterest. It is a great place to share different images and info about your products.
5. Setup Email
Next, you’ll want to set up an email list for your store. To do this, you’ll want to use Klaviyo, the best email provider for Shopify. When you sign up here, you can collect up to 500 subscribers for free.
This tool will integrate with your Shopify store and help collect email addresses from your customers when they buy your products.
You can also use it to collect emails from people interested in buying from you but not ready yet.
One simple way to get subscribers on your list is to offer them a coupon code such as 10% off when subscribing to your email list.
6. Setup Abandon Cart Checkout
Next, you’ll want to add the abandoned cart set up to your store. This will email people when they add something to their checkout but don’t buy.
The abandon cart checkout technology in Shopify will automatically email them and let them know to complete their order.
People don’t always finish their checkout, the phone rings, your kids need something, or they get distracted and forget about it. The abandoned cart checkout will lure them back to your site to complete the purchase.
7. Offer a Bonus
Next, consider offering a bonus with your popular products. A bonus will entice people to buy over your competitors if they’re not offering it.
For example, if you’re selling a pub table, you could include a free set of wine glasses or placemats. These don’t have to be big but enough to entice them to buy from you, not your competitor.
A simple way to find these bonus products is to look at what your current suppliers are already selling and ship it directly with the product at no extra cost in shipping.
8. Improve Site Appeal
To get people to buy from you more, you also need to improve your site appeal, and there are a few things you can do here.
Accept All Forms of Payment. You want to accept all types of credit cards as payment, but you also want to accept PayPal, Google Pay, Apple Pay, and even Venmo. The more forms you accept, the better chance you’ll get the sale.

Page Speed. You also need to improve your site’s page speed. To do this, you’ll want to keep your images small. Like this free image compressor, you can use a compression tool to make your images smaller.
Just upload the image, which will automatically compress it around 70 to 80% of its original size.
You will also need to check your page’s load speed. To do this, you will need to use a tool like GTMetrix. This will tell you how fast your page loads and where the problems are.
As an example, I ran SideHustleAcademy.com in the tool, and it gave me these results.
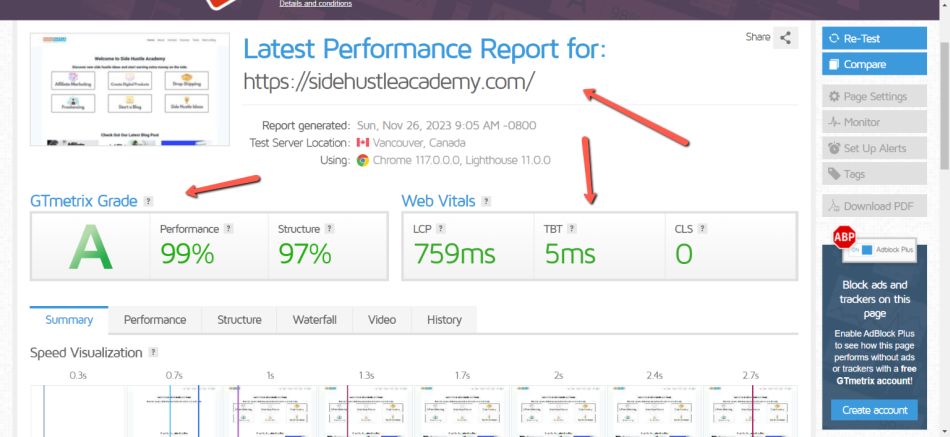
As you can see, SideHustleAcademy.com loads fast, which is great.
Run this test on your best-selling product pages and work to get your page speed as fast as you can and try not to add too many Shopify Apps, and large images to the page.
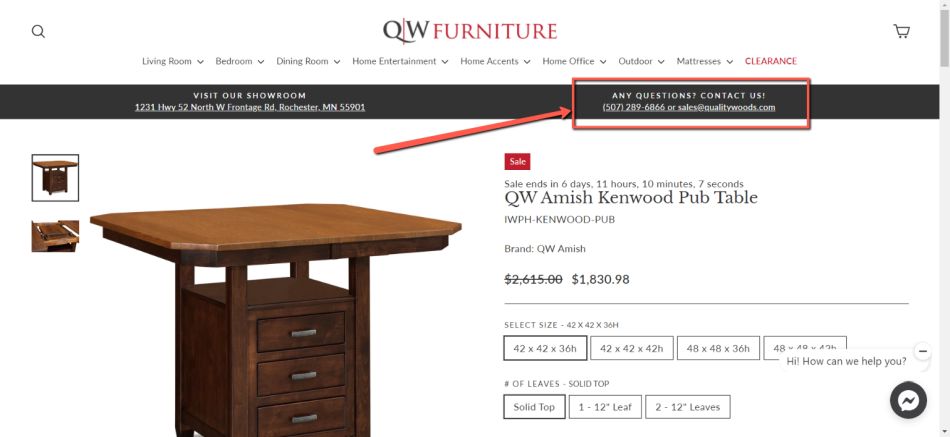
Add Your Contact Information. Next, you must add your contact information at the top of your page so customers can call or email you with any questions.
This will show that you’re a credible site so people can access you. This should be shown right at the top of every page on your site. Below is an example.
Make Your Top Products Easy to Find. Finally, you want to make your top products easy to find. Once you get some initial sales, you’ll start to find what your most popular products are.
When people visit your site, you want to put these products before them. This is why need to create a collection on your Shopify store that will be the most likely products they’re looking for.
The best place to add this is to your home page, right at the top.
9. Buy Now, Pay Later
Financing is an excellent way to get people who can’t afford the total cost upfront to buy products from your store. According to Granify, adding a buy now, pay later option can improve your conversion by 20% to 30%.
Here is a list of companies you can look at to add to your store. You don’t need all of them but one or two.
10. Add Chat to Your Store
Chat is a great way to talk to customers and answer questions. Now you might be wondering how you add chat to your high ticket dropshipping store if you’re doing this on the side.
The best way to do this is with Shopify Inbox. With this tool, you can add a chat box to your site, and then when someone has a question, it can get sent directly to your phone, where you can answer it,
So, no matter where you are, you can answer your customer’s questions, send them discount codes, and get them to purchase faster.
According to Shopify, 70% of all Shopify Inbox questions are related to customers’ purchasing decisions.
11. Add Tracking to Your Store
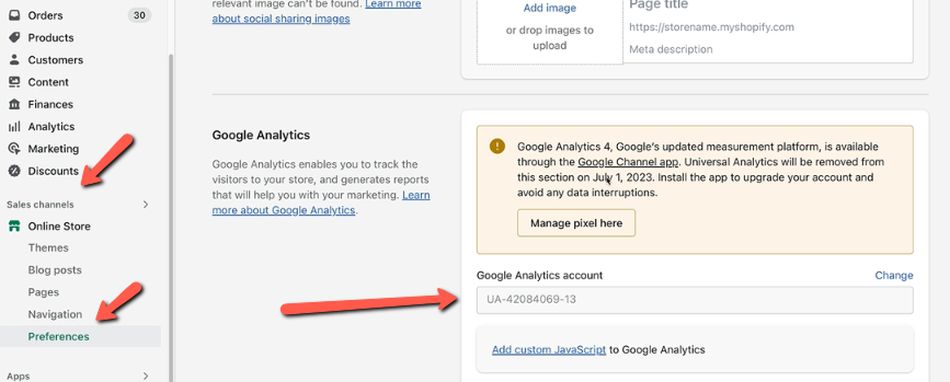
Finally, you want to add Google Analytics tracking to your store. By adding tracking to your store, you can learn more about your customers, what they are looking for, what they’re buying, and, more importantly, where you’re converting people into customers.
To start, create your Google Analytics account here.
Next, you will need to input your Google Analytics tag on Shopify. You can do this by visiting your Shopify account, clicking Sale Channels, and clicking Preferences. You will then want to input the Google Analytics account number here.
Step 5 Task
- Come up with expiring coupon codes.
- Create a Shipping and Returns Policy and link it to all product pages.
- Add Judge.me product review Shopify App.
- Create a social media page you plan to use.
- Setup Email with Klaviyo.
- Setup abandon cart Checkout on Shopify
- Come up with Product Bonus Ideas
- Add as many forms of accepted payment as you can.
- Add contact info at the top of your store.
- Compress all product images.
- Create a Best Of Collection for your store’s home page.
- Add buy now and pay later to your product pages.
- Add chat to your store with Shopify Inbox.
- Add Google Analytics to your Store.
Step 6: Get Traffic and Make Sales
Now it’s time to get things rolling and start making some sales. All the work you’ve put in so far has led up to this point, getting traffic and making sales.
The question is, how do you get traffic to your store? Google Shopping Ads.
So, what are Google Shopping Ads? These product ads show products in Google Shopping and Google Search. You may have seen these before.
Create an Account a Google Merchant Center
First, you need to create a Google Merchant Center account. Google Merchant Center is what you will use to list your products in Google Shopping for free and manage your Google Shopping Ads.
To do this, I included a great video to walk you through the process.
Set Up Your Google Shopping Feed
Next, you’ll want to add your store to Google’s Merchant Center. This allows your products to show up in Google Shopping for free, but you need a way to control it. This is where Simprosys comes in.
With this app, you can manage the feed with much more control. Here is a quick tutorial to do this.
Set Up Your Ads On Google Shopping
Once your feed is set up, you must set up your ads with Google Shopping. With Google Shopping Ads, you must pay to be shown in the sponsored spots.
Below is a great video to help you get this started.
Here are a few tips when you’re setting up ads.
- Never spend more than 10% of the total cost of the product. If the product costs $1000, you should not spend more than $100.
- You should earn a 10x return for every dollar you spend on ads at a minimum. $1 spent should be $10 in earnings.
- Remove any keywords that are not converting. Add keywords to your negative list that don’t fit the topic of the product. This will improve wasted ad spend.
- Run an Alfa/Beta campaign in Google Shopping. Alpha keywords are for more specific keywords like SKU numbers and product names and get more of the ad spend. Beta keywords like pub tables are more general and get less ad spend.
- Set your daily ad budget between $15 to $30 a day. You want to keep your initial daily ad spending low, and once you get your alpha/beta campaign working smoothly, you can increase it slowly.
- Aim for a 2.5% Click-through Rate. You should get 2.5 clicks out of every 100 impressions on your ads.
Step 6 Task
- Set up your Google Merchant Center Account.
- Submit your Google Merchant Center Feed with Symprosys.
- Set up Your Google Shopping Ads and start running traffic to your site.
Step 7: Outsource and Automate
Once your ads bring in traffic at some point, you’ll want to outsource and automate things so you won’t have to do everything from contacting suppliers to managing customer calls.
The question is, when do you outsource and automate?
You must learn the ropes before outsourcing and automating your high ticket dropshipping business. You need to talk to customers, answer questions, order products from suppliers, and add the products to your Shopify store.
So spend the first six months learning the business, and then you can start to automate and outsource things.
Once you’ve reached this point, you can implement a few tips below.
Create Standard Operating Procedures (SOP’s)
First, while learning the ropes, you’ll want to create standard operating procedures, also known as SOP’s. These documents explain how to do things in your dropshipping business.
For example, every supplier you deal with should have an SOP that explains how you order a product with them and ship it. These SOP’s will be used to train others you may hire to help you run your business.
Here is a list of SOP’s you should create:
- Ordering products from suppliers.
- Adding products to your store.
- Answering customer support questions.
- Doing weekly ad reviews.
- Contacting abandoned cart customers.
- And many more
Automate Your Order Processing
Next, you’ll need to automate your order process. The ordering process can be automated when orders are submitted by email to your suppliers. In most cases, this is how you’ll submit orders. Your suppliers will then place the order using your credit card on file.
You’ll need a service like Zapier to help you automate this.
The way this works is you’ll integrate Zapier with Shopify. Then, you’ll each Zap individually with each supplier in your store. This works with an if this, then that solution.
For example, if a product is ordered by supplier A, then email them to place the order and send the order to the customer’s address.
Doing this speeds up the order process, so if you are at work or don’t have access to a computer, it will get placed fast.
Abandon Cart Automation
Next, you’ll want to set up an abandon cart automation. Initially, you can do this yourself because you do not have too many orders to manage.
After a while, you’ll want to automate this so that when a customer adds something to their cart and doesn’t complete the order, it will automatically email them.
Here is a great abandoned cart tutorial to help you set this up in Klaviyoo.
Order Tracking and Review Automation
You’ll also want to automate order tracking. Initially, you want to track each order individually with a Google spreadsheet. This will show you exactly how much profit you make on each order.
Here are a few things you’ll want to track.
- The product bought.
- The cost of the product.
- The cost of shipping the product.
- The promotion applied.
- Taxes collected.
- Credit card fees.
- Profit earned.
To do this, you’ll want to use Zapier. Using Zapier, you can have it communicate between your Shopify and your Google Tracking Sheet.
You will want to set individual Zap’s for each one of the items I listed above. This will move all of this info to the spreadsheet and show you how much you profit on each sale.
Knowing this will help you spot where you’re making money and where you’re not.
Hiring a Customer Service Representative
Finally, you need to consider hiring your first employee. The question is who you should hire and what they should do.
The first person you want to hire is a customer service representative. This person will be responsible for customer calls, emails, and online chats. Initially, you’ll want to start with one of these three things.
For example, if you’re teaching them how to answer phone calls, you’ll want to sit on several calls and review the process. You make the first call, and they will make the next call till they understand the whole process.
So where do you find these people to help you? Start by looking for someone in your local area, maybe a family member or friend.
If that doesn’t work, check out onlinejobs.ph. This website is dedicated to hiring people from the Philippines. This might sound a little scary at first, but the Filipino people are very hard workers; they know English well and don’t charge nearly as much as someone who lives in the States.
The key here is to have your SOP’s in place and know the process well before hiring your first employee.
Do You Need Help Starting Your High Ticket Dropshipping Business?
Now that you’ve seen the seven-step process to starting a high ticket dropshipping business, you might ask what I do if I have questions or don’t know what to do next.
For this, I recommend becoming a member of Dropship Lifestyle. This complete course gives you an over-the-shoulder look at how to start a high ticket dropshipping business.
If you want to learn more, I created a complete video walkthrough of the entire course and what you’ll get as a member of this community.
I’ve been a member of this course for several years now, and it not only walks you through how to start a high ticket dropshipping business but also gives you a community where you can ask all the questions you need.
They also do monthly Q&A calls to help you out as well. Starting this type of business can feel like drinking from a firehose at times, and this course will help keep you on track.