How to Start a Successful Blog – 5-Step Guide (2023)
Do you want to know how to start a successful blog in 2023?
Incredibly, I started blogging over 15 years ago, in August 2008. Starting a blog has been one of the single most important things I’ve done in my life.
It has been the one side business that has earned me more than any other. In 2022 alone, I earned over $43,000 and drove thousands of site visitors.
So how do you start a successful blog? There are five steps to creating a successful blog.
In this article, I will share my ten years of experience on how to start a successful blog and grow it into a thriving part-time business as I have.
I’m going to share how I pick a niche, set up my site, create content, promote, and even how to earn money.
Tools Mentioned in This Article
Before I get into the how-to of this article, I wanted to share a short list of all the tools and courses I mention in this article since it is a long article, so you don’t have to waste time scanning through to find that one link back.
- Bluehost – The hosting company I recommend for a successful blog
- WordPress.org – The Content Management Platform I use.
- Google Adsense – An advertising platform that I first started earning money with.
- Teachable – A platform for hosting online courses.
- Blog Growth Engine – The Definitive Course for Building a successful website I Use.
- Convertkit – This is the email solution that I use to keep in contact with my audience.
- Canva – The tool I use to create all my images for my blog post.
- ScreenPal – Screencasting software I use to record my computer screen.
Disclaimer: I am an affiliate of the products mentioned in this article. Earning go to support this Side Hustle Academy.
How to Start a Successful Blog in 2023

Below are the five steps you need to follow to start a successful blog in 2023. Please take a moment to save this link to your browser to get back to it quickly.
#1 Find a Profitable Niche for Your Blog
Finding a profitable niche for your blog is the foundation of starting a successful blog. I’ve made my fair share of mistakes over the years.
He is just a few things to avoid, so you pick the right niche.
Don’t Go to Broad. The first tip is one that I’ve made a few times, and that is going way too broad for the topic of your website. My very first website was on the topic of personal finance.
Going too broad spread my site thin, and I talked about too many topics. This caused my audience to get annoyed because one day, I might be talking about paying off debt, and the next day I would be talking about investing.
Don’t Pigeonhole Yourself. On that same note, you don’t want to pigeonhole yourself to a very narrow topic. For example, you don’t want your topic to be about paying off credit card debt in Ohio.
The problem with this niche is that it’s too narrow and that paying off debt in Ohio will be very similar to paying off debt in the rest of the country.
So how do you pick the right niche? To do this, you need to answer three basic questions.
Who are you trying to help?
The first thing you need to know is who your target audience is. Is it single people, married couples, businesses, and anything in between?
In my case, I focus on married couples with a family because I fit the description of my avatar. I lived through this situation, making understanding and sharing advice easier.
What problem are you trying to solve?
Next, what problem are you trying to solve with this person? In my case, it’s to help working families earn extra money and possibly quit their 9 to 5 soul-sucking jobs.
As a result, they could spend more with their family, pay off their debt, and even take their family on vacations they never could till now.
I understand these problems because these are the same problems I faced when I started my side hustle.
What is the solution to that problem?
Finally, you need to know what the solution to that problem is. The solution is what they get by following your blog. If this is clearly defined, people will continue to follow you.
The solution is the result that your readers will identify with that will keep them motivated and reading your blog.
Once you’ve answered these three questions, you can take your answers and begin to piece together the niche you are targeting.
For example, mine is to help families earn money on the side and take back their nine-to-five.
Do It Now: Take a moment and answer the 3 questions above and determine what your niche is. If you need a little help leave a comment below.
#2 Setting Up Your Blog
Now that we have an idea, it’s time to figure out your domain name and set up your hosting, and for this, I like to use Bluehost since it’s easy to use and inexpensive.
On top of that, I’ve found them to have the most straightforward interface to work with for getting your site up and running the quickest.
So follow these steps, and you’ll have your blog up quickly.
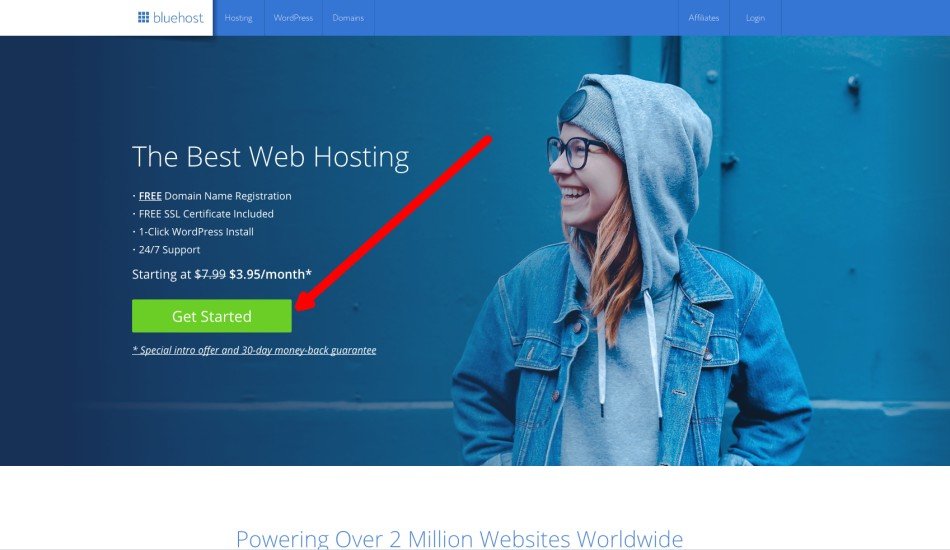
Step #1 – Go to Bluehost.
To get started, click this link to go to Bluehost. Then click the big green button that says Get started.
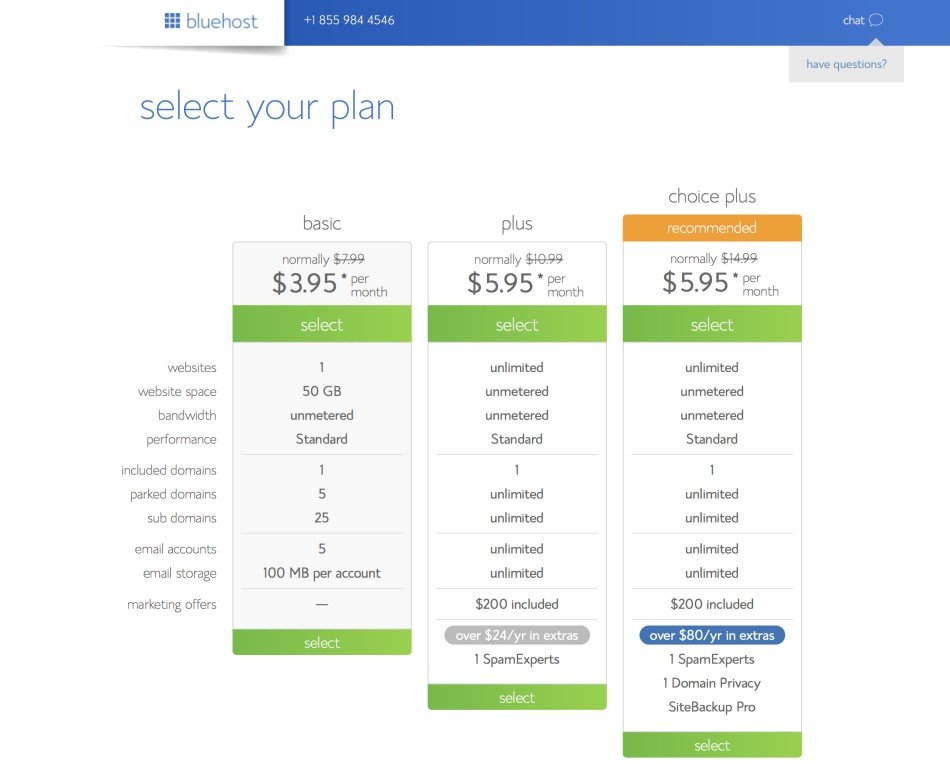
Step #2 – Choose a Plan
Once you’ve done this, you’ll see a page offering three different pricing options. The first option is the standard plan on the left side of the page which is the most cost-effective.
Related Article: How Much Does It Cost to Start a Blog?
However, I recommend the middle option, the Plus Plan, which gives me unmetered hosting space and the ability to host multiple websites on one account. So if you plan to create more sites in the future, it won’t cost you any more.
So if cost is a concern, go with the basic plan, and you can always bump up to the plus plan if you need to.
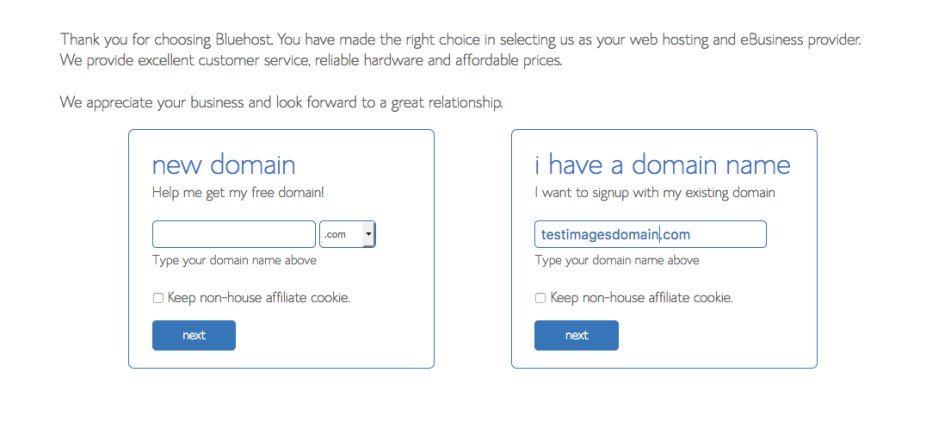
Step #3 – Add Your Domain Name
Next, you’ll want to add your domain name. You get a free domain when you sign up for a Bluehost account. Type it in; otherwise, you can add an existing domain name.
Side Note: Take an extra second to spell check the domain name to make sure it’s correct.
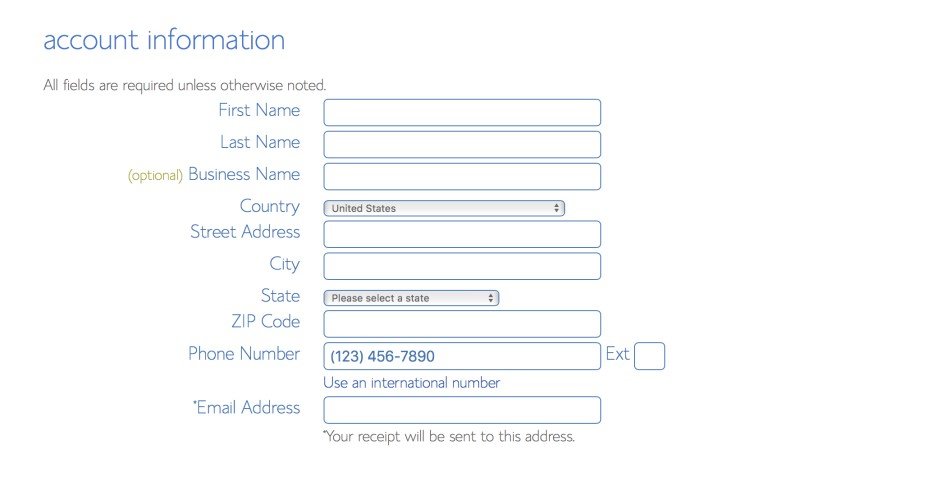
Step #4 – Fill Out Your Account Info
You must fill out your account info once you decide on a domain name. Include everything from your email to your phone number. If you don’t have a business name, don’t worry about it for now.
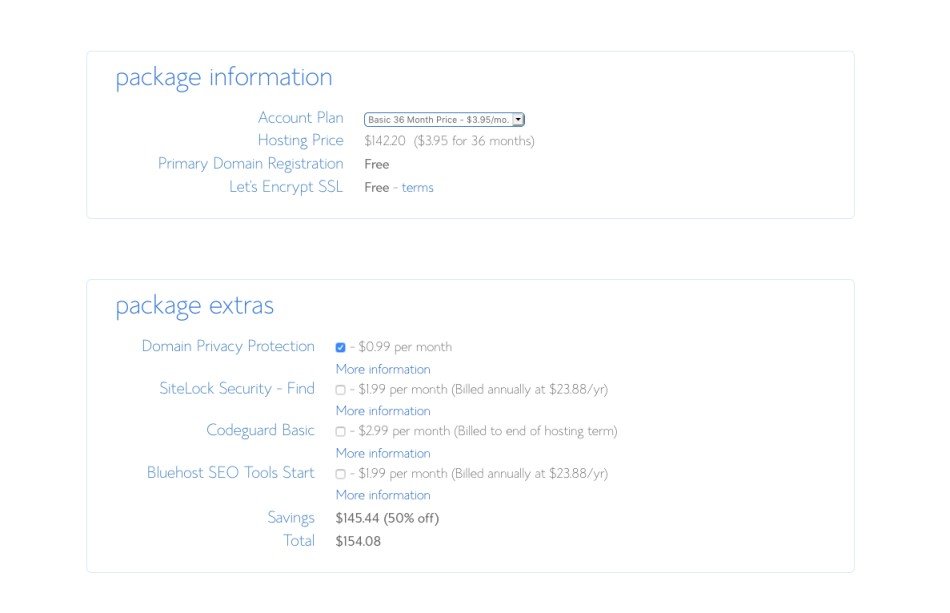
Step #5 – Select Package and Extra Options
Next, you’ll want to select the package option that fits your budget. You’ll want to sign up for a 36-month plan for optimal pricing. You can also do a 1-year or 2-year plan, but you save the most with the 36-month plan.
You can also add package extras like Domain Privacy, which blocks people from seeing your info, such as name and email, on the internet. You don’t necessarily have to do these options, but if privacy concerns you, add it.
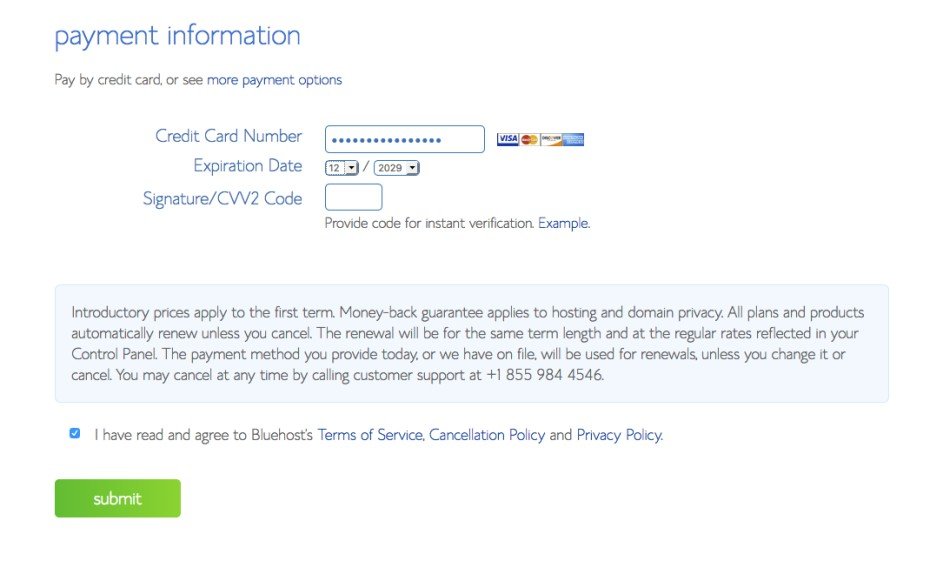
Step #6 – Input Your Payment Info
Once you’ve selected the length of the plan, you’ll need to input your payment info. Add this and click the checkbox that says you agree to all terms of service, cancelation policy, and privacy policy. Then click the green button that says submit.
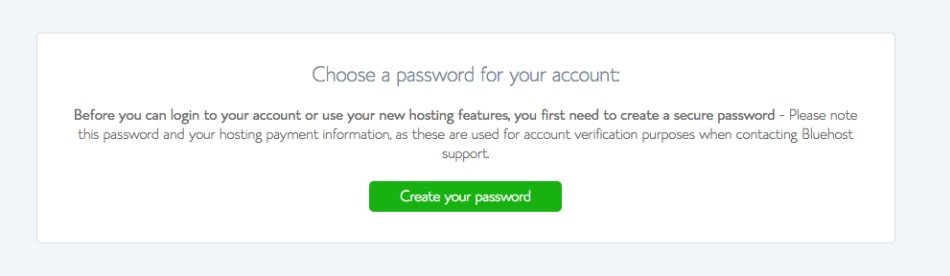
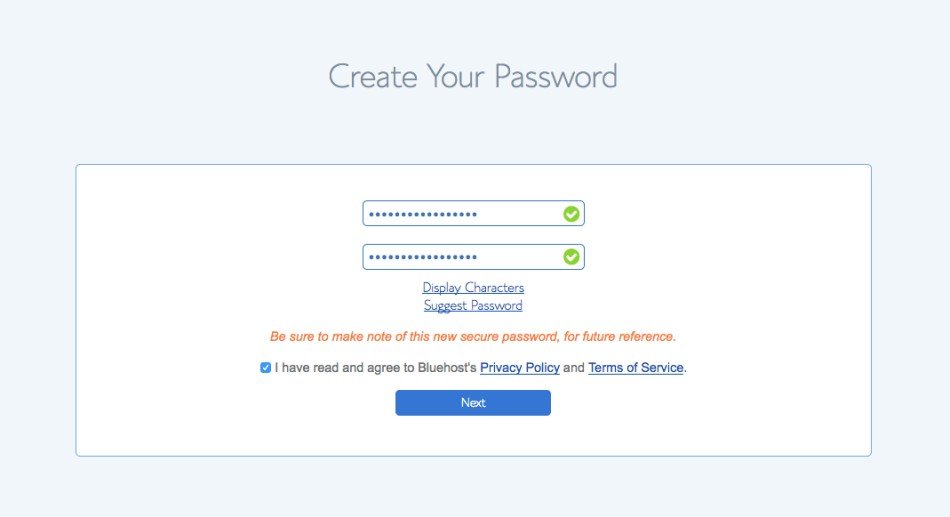
Step #7 – Create Your Password
Once you’ve paid, you must create a password for your account. You’ll get a screen that looks like the one below. Click the green button that says Create your password.
Quick Tip: Make sure your password is strong. Include lower and upper case letters, numbers and symbols. Your entire blog will be on this server and the last thing you want to do is build up a successful blog only to have someone hack it.
Now you should see a page where you can input your password in. Click the checkbox to accept the terms of service and privacy policy and hit the blue button that says next.
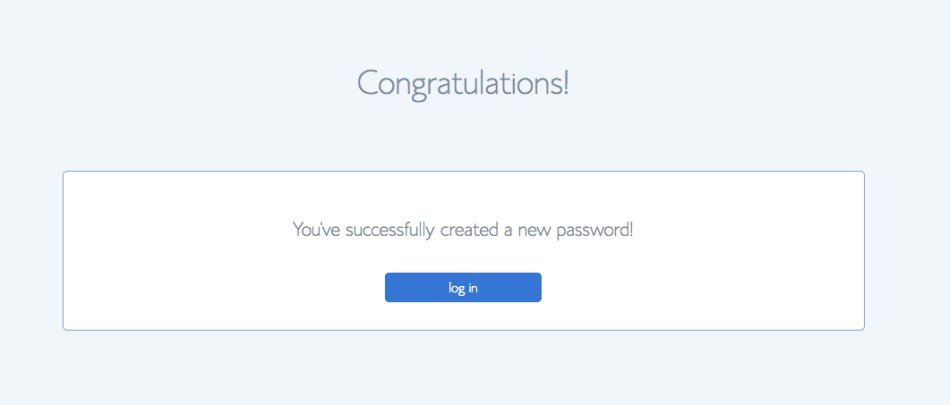
Once you’ve done this, you should see a page that says Congratulations! Now click the blue login button and sign in with your email and new password.
Step #8 – Pick a Theme.
Now that you have your plan and logged in to your account, you’ll want to pick a theme for your site.
A theme gives you a basic style and structure to your website. To get started, I recommend the Kadence Theme. It’s free to use and is updated regularly.
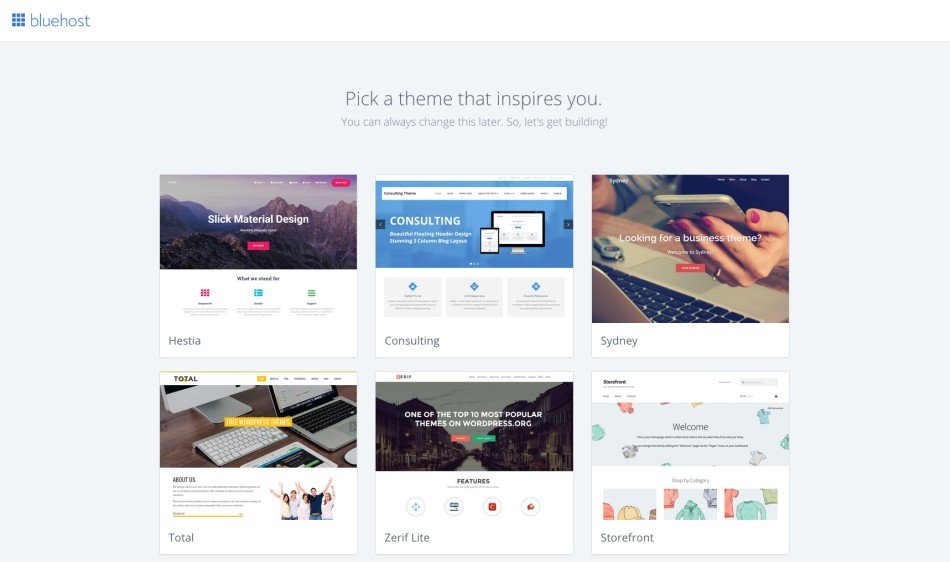
Once you’ve picked a theme, it’s time to install WordPress. To do this, click the blue button that says Start Building, and WordPress will be installed automatically.

Step #9 – Launch Your Site
We’re almost there. The last thing we need to do is launch your site. Before doing that, we have a few things we need to do.
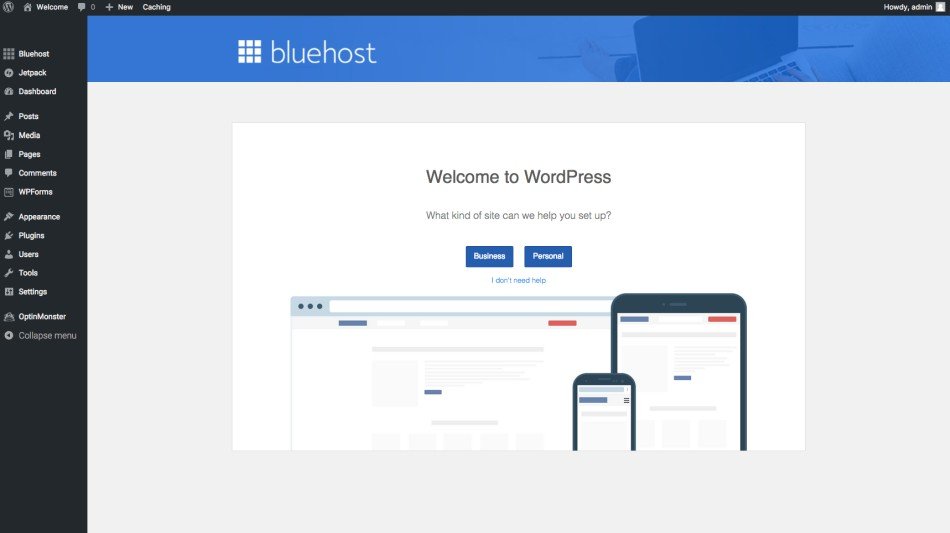
Once WordPress has finished installing, you will see a page that looks like the one below, asking if you are doing a more Personal or Business type site.
It doesn’t matter which one you pick here. Click one and move on.
Once you’ve clicked the button, you’ll get a screen that asks you to fill in the name of your site and a short description. Fill this in for now with the title of your site and a short description. You can always change this later if you want.
Then click on the blue button that says next step.
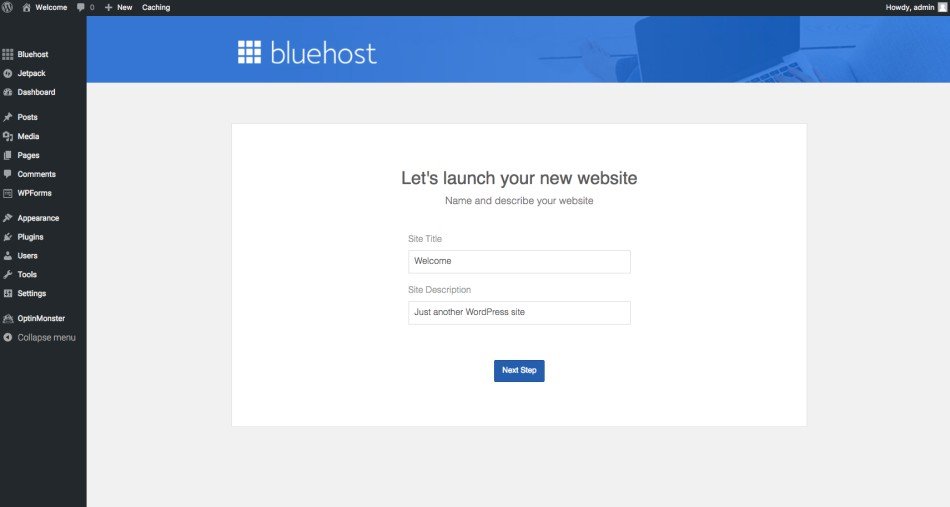
Congratulations! You’ve done it. You’ve now created your blog. Now you have to create your first blog post. You should get a page that looks something like this.
#3 Write Your First Blog Post & Setup Your Content Plan
Now that you have your site up and running, we need to create a content plan for your site, and on top of that, I will show you how to create your first blog post. This is where the rubber hits the road in creating a successful blog. I also use this method to create my content plan and blog post.
So how do we come up with the content to write? We could use all kinds of expensive keyword tools or even Google’s keyword tool, but there is a much simpler method than all of this.
One Big Mistake to Avoid Before We Go Any Further
Before I go any further, I want to mention a big mistake many people make, including myself, which is writing content on whatever you have on your mind.
When I first started, I didn’t pay attention to keywords and everything else. Instead, I just wrote whatever came to my mind.
The problem with this approach is that when you’re an unknown blogger just getting started, it will be very tough to get people to find you out in the big world of the internet.
With millions of people clamoring for the attention of all the blogs, you need a method that drives traffic to your site.
This is where keyword research comes in. On top of that, you need to create helpful content, and in the rest of this section, I will show you how to do this.
How to Find the Right Keywords for Your Blog
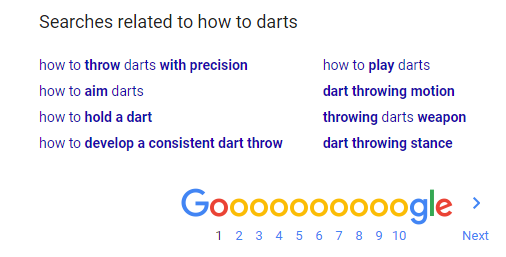
To do this, we need to go to Google. The great thing about Google is that it will tell us exactly what people are typing in the search engine. For example, let’s say that your site topic is all about playing darts.
I have a dart board in my basement, and it’s the first thing I could think of. So I type how to darts in the search bar just like the image below, which is what I get.
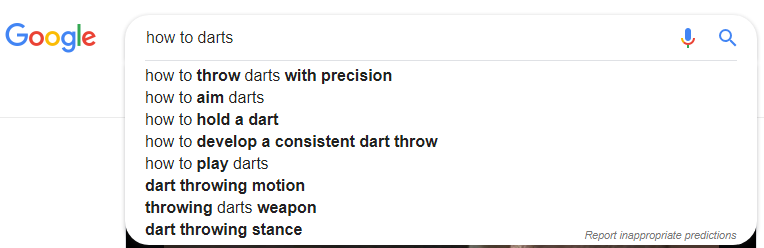
In the example above, we can see all kinds of ideas. You can write articles on how to aim darts, play darts, and hold a dart. These are all great ideas that people are typing into the search engine and looking for an answer.
When we scroll down the page, we see a list of questions in Google.
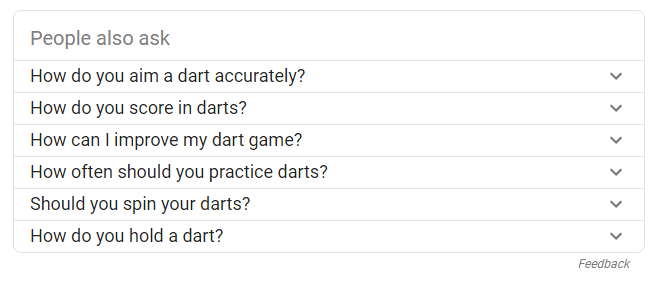
As you can see, we have a whole list of questions that we could write articles on: Should you spin your darts, so how do you score in darts?
And then, when we scroll down to the bottom of the page, we see another list of options.
Now you might be wondering why wouldn’t you use the Google Keyword Planner or some other keyword tool, and the reason is because of most of the numbers in those tools are usually wrong.
On top of that, the method I laid out above will give you an idea of what people are typing into the search engines.
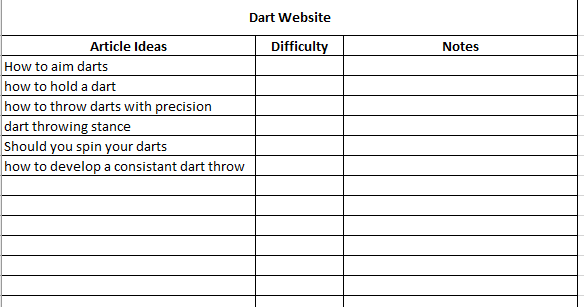
How to Develop Your Content Plan
So now that you understand how to find article ideas take a moment to find a good 30 to 50 ideas. For this, I like to organize them in an Excel spreadsheet, but anything will work. Below is a chart I put together on the dart topic.
Once you have a list of ideas, your next step is to figure out how complex your chosen ideas are.
In most cases, the topics you’ve chosen are not as difficult to rank for as you might think. However, starting a new site will take a while to start ranking in Google.
Side Note: If you have a new site it may take upwards of 8 months for your article to rank on Google and start driving in traffic.
So how do you check an article idea to see how difficult it is? You search on Google.
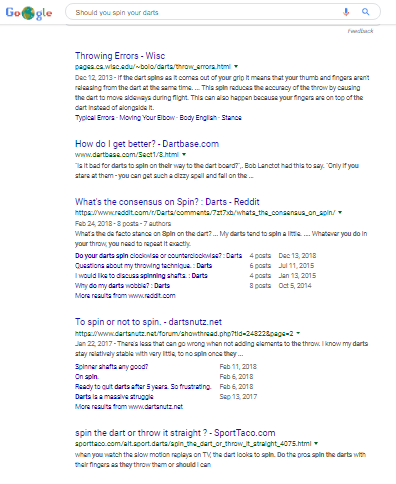
When we investigated the results, we found the first two results have content on them, but the sites look a bit dated, like they were made back in 1995, which is a good sign that nobody is actively pursuing this phrase. The third is a Reddit article which is a good sign, and the fourth is a forum.
When you see a Reddit or a forum search result, they are user-generated content, which means Google can’t find a good article to put in the top 10, which means this would be an accessible article for you to write about.
Competition
As you go through your list of article ideas, you’ll be looking for the terms that are easier to rank for, like the one I just showed you. But what about the terms that are a little more competitive?
I batch my content into three areas.
#1 No Competition. Like my example, these are typically article ideas with little to no competition. These articles are usually just answering a question. The article is roughly 1500 words and gives a clear and concise answer to the question in the article.
#2 Medium Competition. The next level of competitiveness is a medium level of competition. These articles typically have more brutal search results but still offer a chance to rank.
It would be best if you stepped things up with a well-written article of around 2500 words. These articles also work well for list posts and competitive answer posts.
#3 High Competition. The final level of competition is high competition. You could write about The most competitive topics in your niche. These are typically the guides or how-to articles such as the one you are reading right now.
The competition for the phrase “How to Start a Blog” is very high, and for me to rank, I need to write a great article to even think about ranking in the top 10 for that term. A high-competition article should be at least 3500 or more words.
As you go through your list, do as I did and search for the competition for each term. If you see a lot of big authority sites in the top ten, mark it a high-competition article.
If you see a few bigger competitors and some forums or smaller niche blogs in the topic, it would be more of a medium competition.
Finally, if all you see is a few small niche sites, a Quora forum post, Yahoo answers, or a Reddit post, those terms will likely be very easy to rank for.
3 Tips for Creating Your Content
By this point, you should have your list of topic ideas and the level of competition written next to it. Now it’s time to write your content. In this section, I will share a few tips I’ve learned to help you write your content.
Give the Answer Up Front
One of the biggest mistakes I see people make is not answering an article until the end. Instead, I like to do this at the beginning of the blog post.
You might be thinking, but I want people to read the whole blog post. The problem with putting the answer at the end of the article is that people feel it may be boring and leave before they get to the answer.
If you give them the answer right off the bat, the visitor will feel like they’ve gotten value from you.
For example, if I were writing an article on Should I Spin My Darts, my answer paragraph would be something like this
Ex. Yes, you want to spin your darts because it will give you a more accurate throw.
The thing is, it doesn’t have to be the whole complex answer. It just needs to be an answer, and then, in the rest of the article, you can dive into the entire explanation as to why you should spin your darts as you throw them.
Keep Your Articles Long
When it comes to Google, they like to see longer articles. I’m not sure why this is, but I think it has to do with the fact that it allows for more explanation. I vary the length of an article based on the competition. Below are the typical length guidelines I follow.
- Low Competition – 1500 Words
- Medium Competition – 2500 Words
- High Competition – 3000+ Words
Provide Helpful Advice
Many people think the only way to make money online is to write nothing but product reviews or best-of articles, which isn’t true.
Instead, focus on giving your readers helpful advice, which will signal to them that you are trying to help them and not just sell them.
The selling comes from providing that helpful advice. I’ll talk more about that in the last section of this article.

Finally, if you want to learn more about how I create content for my blog, check out Blog Growth Engine. They are who I recommend if you want to build a successful blog.
I’ve been a member of them for a long time, and they will share the exact method I’ve been sharing with you in this article but in more detail.
#4 Create A Promotion Plan
Now that you’ve got a content plan, you’ll need a way to promote your blog, which is not as complex as you might think.
When it comes to my blog, I have three ways that I promote my blog. First, I have two external and internal methods for promoting my audience.
The great thing about my methods is that they are simple and easy. However, the methods I use may not precisely be the methods you will use. This is because everybody’s audience and market are different. So as I go through my method of promoting my blog, think about which ways you will promote your blog.
Search
The first and most straightforward way to promote your site is to get search traffic from Google. The great thing about this method is that you will already do this if you create content using the suggested method.
If you follow my suggested method, your blog will grow its traffic automatically over time. Search traffic doesn’t come fast at first, though. Search traffic is all based on trust. The more Google trusts your content, the more they will rank you for your articles.
In most cases, it will take around a year to gain this trust with Google and build this as a solid traffic source.
However, this doesn’t guarantee that you will get traffic. You must follow things closely, as I’ve shown, and if something doesn’t work, you need to figure out why.
What About Backlinks, Though?
One common objection I often hear is getting backlinks to your site to speed up the process.
I backlinked years ago on a couple of my first blogs, and every time I did, it always ended in disaster. Now there are two kinds of backlinks you can get.
Black Hat links are where you pay someone to build links to your site through a private blog network or a bunch of low-ranking sites with little to no authority.
The bad part about this method is that Google can usually detect this fairly quickly because they will notice many links being added to your site. I did this on one of my first sites, and it destroyed it.
White Hat Links – This backlinking method is a legit way to earn links. These links are earned naturally as you write great content; others find your article online and link back to it.
An excellent example of this was a few years back I was contacted by Mint.com to do an interview. After publishing the interview, they added a link mentioning the site I wrote for.
YouTube
The other method I use to promote my site is YouTube because I find videos a great way to connect with my audience.
Over the last two years, I’ve done 17 videos and have over 700 fans and thousands of views. On top of that, it has driven some excellent traffic to my site and helped build my brand.
I like YouTube mainly because it allows me to connect personally with my audience. Some of you may like Facebook, Pinterest, or even Podcasting better, and that’s fine, but I find YouTube is a great way to get yourself out there at a minimal cost.
So here are a few tips I recommend if you plan to use YouTube to promote your blog.
Create a New Channel
First, you’ll want to create a brand new channel for this. Early on, I made the mistake of putting my videos on my account, and switching to a branded channel was a bit of a pain.
I also suggest naming the channel the same thing as your blog to avoid confusion. The title should also be closely related to your topic as well. This will help people understand what your channel is about. This will also help filter people out so that you get subscribers who are interested in your channel.
 Use ThumbNails
Next, you’ll want to use thumbnails for the cover of your videos. The great thing about thumbnails is that they can draw in many views if done right.
YouTube has found that adding a thumbnail to your video draws more people to click and view your video. Videos without a thumbnail tend to get fewer clicks.
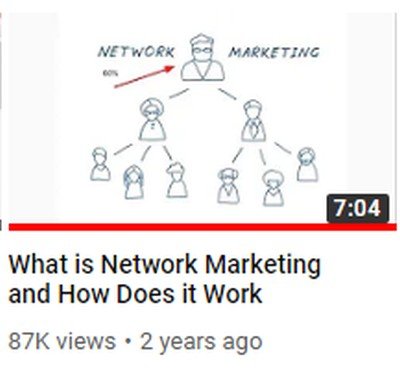
The thumbnail I created for this video has brought in over 87,000 views. When I do videos, I like to add arrows and even a picture of myself sometimes where it makes sense.
Finally, to create your thumbnails, I like to use Canva. They have preset templates, so you must create your image and upload it to YouTube.
Don’t Try to Be Perfect
Finally, the last tip is that you don’t need to make this video perfect. You don’t need any professional video editing software like Adobe.
Instead, use your iPhone and just hit record. The less professional approach works much better and comes across as more authentic.
I also like to use ScreenPal to record my screen as I explain something.
This reasonably cheap screen recording software costs $36 to $120 for an annual subscription. They even have a free option if you’re looking to save money.
The final way I promote my audience is by email. I use This internal method to share content, sell products, and set up an automated response system. I like to use Convertkit because I find it the easiest to work with without understanding all kinds of tech stuff.
Resource: You can check out my full review here of Convertkit along with my behind the scenes video.
You need an email list to keep in touch with your audience. Over time your audience will tend to stray away, and sending a simple email helps keep you on top of mind and draws them back in.
So how do you do this?
 Create a Lead Magnet
A lead magnet, also known as an opt-in offer, is a way you can draw people onto your list.
I’ve created a few of them over the years, but the best way to create a lead magnet is one that addresses a specific niche in your market.
For example, I created this one a while back that shows people 287 proven course ideas.
This lead magnet was created to help people struggling to decide on a course idea for their business.
In my case, my lead magnet was just a simple list I put together. However, a lead magnet can be anything from a pdf file, a video, or even a special podcast episode. The sky is the limit with opt-in offer ideas.
Finally, before I move on, there is one final golden rule you should follow when creating your lead magnet: your lead magnet should be short, simple, and easy to consume.
You don’t want to create a 100-page ebook or a 1-hour-long video.
When it takes a lot of time, people usually say something like…
“I’ll check that out tonight,” or
“I’ll get to that this weekend when I can.”
More than likely, tonight or this weekend won’t happen. I recommend making it something they can consume in the next 5 minutes or so.
This is because it will give them that rush and make them feel like they are taking steps toward accomplishing something.
Quick Tip: Use Fiverr.com to create your lead magnet cover. It’s inexpensive and they usually turn out pretty good.
Sign Up For an Email Service Provider
Your next step is to sign up for an email provider so you can collect emails and send them your excellent lead magnet. Over the years, I’ve used several email providers, from MailChimp, Aweber, and GetResponse, to MailerLite, but I’ve found Convertkit to be the easiest to use.
I’m not a big tech guru, and I wouldn’t say I like complicated stuff. I like stuff that works and is simple to use. If you can run Microsoft Word, you can run Convertkit.
I’ll be honest Convertkit isn’t the cheapest option here, but I tried enough other options that I’m willing to pay a little more so I don’t have to worry about the tech stuff.
However, if you don’t have much money, try MailerLite or MailChimp. They offer a free plan, but I don’t recommend these because they don’t give you access to all the features like sending automated emails.
Click here to get a 14-day free trial of Convertkit.
Send Out Weekly Emails
Finally, once you have your email list set up, the last step is pretty simple, start sending emails. I recommend at least a once per week at the least as your getting started. This will keep you at the top of your audience’s mind, allowing you to draw them back in.
However, the sky is the limit with email. You can send one every day or three times a week if you want to. I recommend following a few tips to build a solid email list.
#1 Send Value First. My first tip is to send value to your list before asking for anything. This is why you created your opt-in. But you can also send value in other ways, from a blog post you wrote, videos you recorded, to a podcast you did. Once you’ve sent value, you can sprinkle in a few offers.
#2 Tell Your Audience How Often. Next, when people sign up for your email list, tell them how often you will send them an email. If you plan to send an email every day and you tell your audience up front, they will know what to expect, and you won’t have to deal with high unsubscribe rates.
#3 Keep Your Word. Finally, above all else, make sure you keep your word. If you tell everybody on your list you have something big coming out on Monday, and you don’t email your list, they will quickly figure out that they can’t trust you. So do what you say you will do, and your audience will trust you.
#5 Create a Monetization Plan
Now that you’ve completed all the steps in this guide, it’s time to dive into your monetization plan. This part probably excites most of us because this is where the rubber meets the road, and we start to grow our income.
This section will discuss four ways I’ve grown my income over the last 10+ years.
#1 Advertising
The very first way I started earning an income online was through Google Adsense, an advertising program that displays ads on your blog, and when people click on them, they will generate a small income.
I’ve earned anywhere from a few cents on a click to as high as $26 for just one click. I still earn a nice income from it, but it makes up a smaller percentage.
There are other premium ad networks out there, such as Ezoic and Ad Thrive, but they require you to have higher traffic levels. For example, your blog will need around 100,000 page views monthly if you want to join Ad Thrive.
With Adsense, there is no limit, and you can start from day one. Click here if you want to learn more about Google Adsense.
Finally, I want to share a few tips I’ve learned over the years about Adsense.
Get Above the Fold
Google will allow you to place three ads per page regarding your ads. I recommend getting at least one of those ads above the fold of your page.
The fold is how your page looks on your screen without scrolling down. So if your ads load and you must scroll down to see the first one, this is not good.
Having one above the follow gets your audience’s eyeballs on them right from the start and gives you a much better chance of getting clicked on.
Blend In
Next, make sure ads blend in with the rest of your content. When your ads blend in, they will look more natural in your content, making them look like they were meant to be a part of that article.
For example, if the links in your article are blue, you want the ads in your articles to have blue links. Make the font size and type the same as your ads. Doing this will make it look like it’s part of the content.
Change Up Yor Ads
Finally, every six months or so, take some time to change up your ads and test new ideas. This is done for a few reasons.
First, your readers will develop ad fatigue and eventually will not even look at them anymore. Changing things up in your ads gives you a new perspective, and people may start to click more on your ads.
The second reason is to test your ad placements. Testing your ads is the best way to see if you can get more people to click on them.
For example, if you get 5000 page views a month and go from a 1% conversion to a 2% conversion rate, you’ve doubled your month with the same amount of traffic.
#2 Affiliate Income
The following method I use to earn an income online is affiliate partnerships. For example, this article recommends Bluehost as my preferred hosting provider. Since I am an affiliate of this, I will earn a commission when someone clicks on a link and signs up.
Today there are tons of different affiliate programs, from Amazon to Bluehost. You can also sign up for a network such as ShareASale, where thousands of affiliate programs exist.
Here are a few tips to consider as your getting started with affiliate marketing
Own the Product
One of the first things I recommend before signing up for an affiliate program is to buy the product. For example, I did a review on Convertkit, and if you read it, you can tell that I own the product because I go way more in-depth with my article than someone who doesn’t
I share a behind-the-scenes video, screenshots of my email list, and more. However, if you can’t afford the product, see if you do a free trial. Getting the product in your hands or front of you will go a long way to more sales.
Less is Better Than More
Next, don’t try to join 20 affiliate programs. There is no way you’ll be able to manage them all and give them the attention they should have.
Instead, stick with just 4 or 5 programs and build those up. If one product doesn’t resonate with your audience, eliminate it and try something else. When you find a product making sales, double down on it and write more content around it.
Create Actionable Links
Finally, the last tip is to make sure you create links that invite people to take action. For example, if I’m promoting Convertkit, I wouldn’t just want a link that says Convertkit. Instead, you want a link that tells people what to do. Like, Click here to sign up for Convertkit.
I also like to use a tool called Pretty Link, a simple WordPress plugin that allows me to create a short link that is easier to remember and track how many people click on the link.
#3 Sponsored Content
Another way you can earn an income is through sponsored content. This is where brands pay you to talk about them in your blog post. I haven’t done much of this, but it has some significant money if you make it a primary focus.
For example, let’s say you have a website about sewing. A sewing machine company could pay you to write articles about their product. They may even give you a free sewing machine to take pictures and videos using it.
So if this is a way you would like to make some money online, here are a few tips.
Make Sure it’s a Product You Approve
First, when you want to sponsor a product, ensure it’s one you approve of. Don’t promote it if it’s not the brand you like or the product you would buy. Your audience will likely see through this, which is not good.
Also, make sure it is a product you own, and if you don’t, talk to the company and see if they can give you a demo product or a free sample.
Talk to Other Bloggers
Second, start with this by talking to other bloggers promoting the product and see if you can get an introduction. Knowing someone who will voucher for you can go a long way.
Build Your Audience
Finally, you’ll want decent traffic to do great with sponsored articles. The more traffic you have, the more companies will pay you.
To develop a solid line of traffic to your site before you start asking to do a sponsored post.
#4 Create a Course
Finally, the last way I’ve earned money from my blog is by creating courses. Now I’ll be honest, it hasn’t been much, but I am working on a new course as I write this.
I did a prelaunch for a course a year ago, which didn’t go as planned, but I learned a lot from it. You can read more about my first course prelaunch here.
Courses offer a great way to share valuable information and earn a solid income online at the same time. If this sounds like a way you would like to earn an income, here are a few tips.
Use a Platform
My first tip is to use a platform for your course. While WordPress is a great place to put your blog, you want a platform like Teachable or Thinkific to host your course.
You can check out my favorite platform here.
These platforms are designed to manage your videos, handle payments, and a whole bunch of other features, but most of all, they will help you shortcut the process by taking care of all the technical stuff for you.
Related Article: Check out my complete review on Teachable and Thinkific here.
Define the End Result
Next, make sure your course delivers a defined result to the student. For example, if your course is about how to throw better darts, your result might be to hit a bullseye 8 out of 10 times.
Giving people a specifically defined result they will get from taking your course drives people to you, the exact people who want to take your course and repel those who don’t.
Give Solid Advice
The final tip when it comes to creating online courses is to give solid advice, and what I mean by that is advice that you’ve personally experienced.
Anybody can create a course that regurgitates a bunch of blog posts you’ve read on the internet, but nothing can replace the experiences you’ve learned.
This kind of insight will make your course stand out from all the rest. To learn more about how to create your first online course, check out Teachable.
Are You Ready to Start A Successful Blog?
As I wrap this guide up, are you ready to start your successful blog? I’ve been blogging for over ten years, and it has been the best decision ever. If there is one advice I could give new bloggers as they are starting, that is to keep going.
When I started my first blog, the learning curve was much higher than today’s. Today’s opportunity has never been more accessible, so why not take that chance?
So take some time now to start your successful blog today.